Tuesday, July 5, 2011

Pattern Review: Butterick 5295

One of my goals for this blog is to post about all of my sewing projects.  Since I have only been sewing for a short time, I think it should be possible to post about the projects I made last year, as the quantity was far fewer than what I have been attempting this year.  And, as a continuation from the previous post, I thought I would show off the first coat I ever made, Butterick 5295.

Butterick 5295
Before last winter (October 2010), I was really only interested in sewing skating dresses and costumes.  However, after losing the sewing mojo for a bit, I decided I wanted to make something really great that I could wear out on a regular basis.  And, after losing weight, I was sorely lacking a decently fitting coat.  Aside from being the first "normal" clothing piece I made (aside from a few things for my sister), this was also the first time I was really interested in correcting the fit of the garment.  I used Claire Schaffer's High Fashion Sewing Secrets and The Perfect Fit to help me enter the world of non-costume garment sewing.  Despite the mistakes and issues, overall it was a fairly successful project and I am still pleased with the results as a first attempt.  The coat took me about 2 months to make; I finished it during the first week of December 2010.

My first coat!
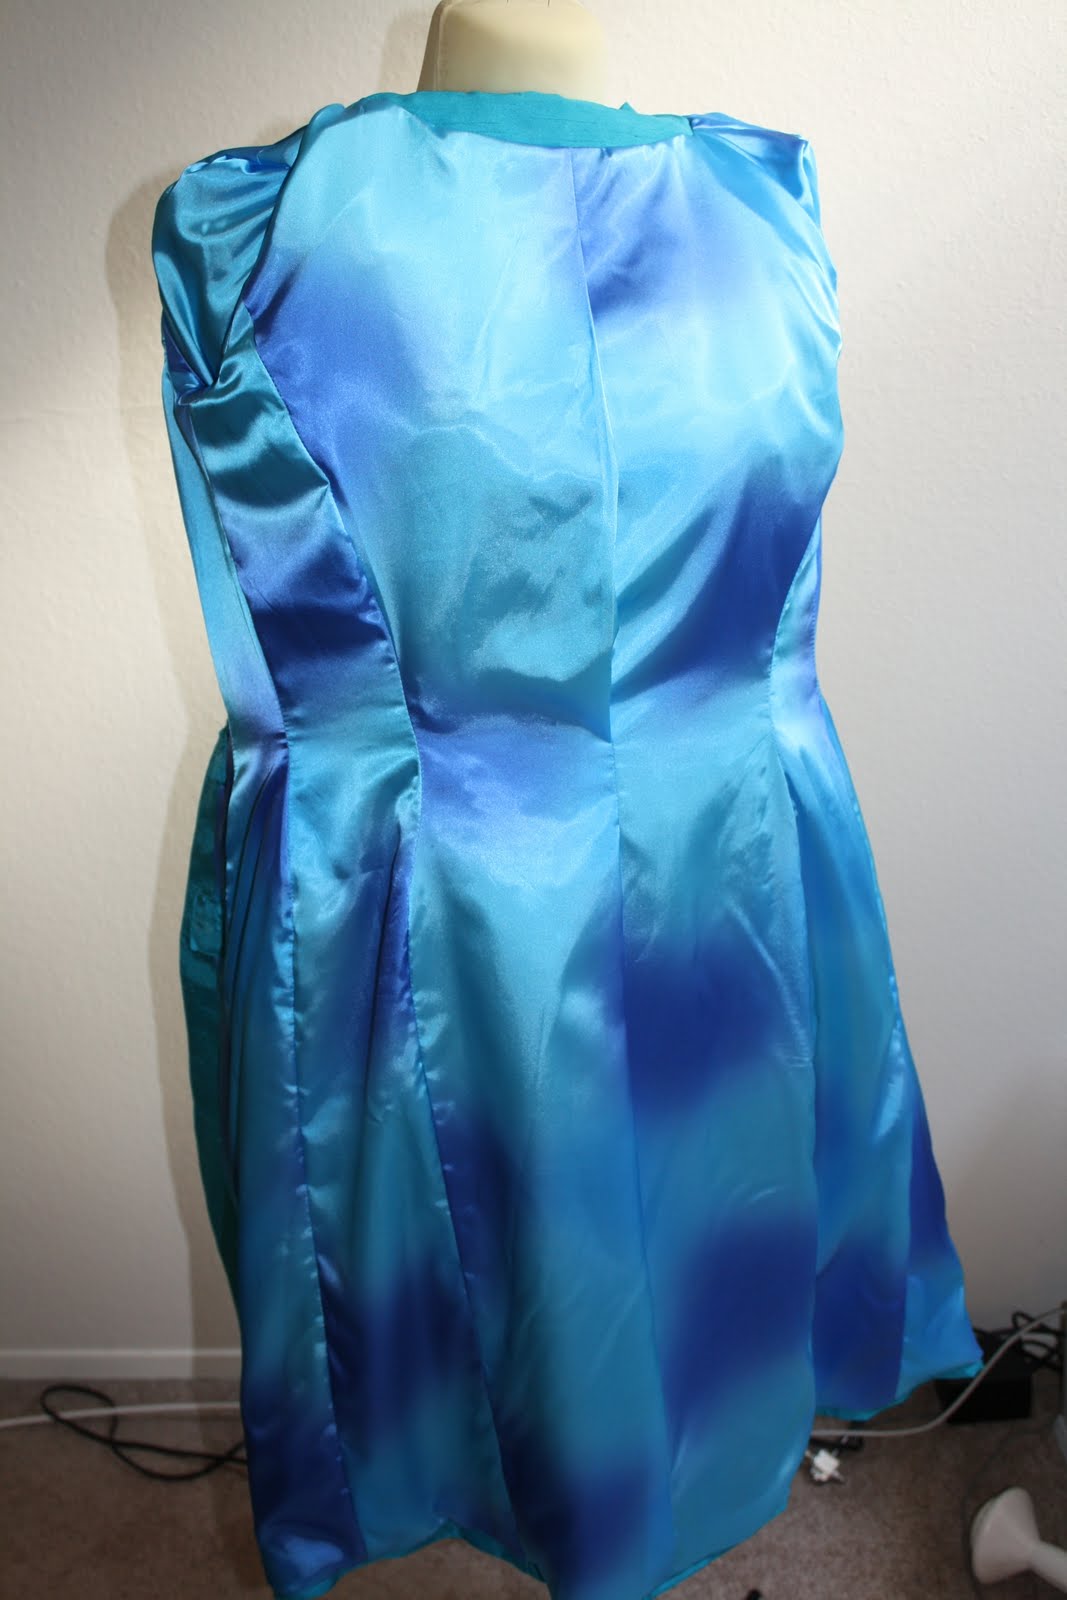
The fabric was some sort of synthetic/metallic houndstooth blend on sale from JoAnn.  I decided to make this shortly after Mondo had lost Project Runway, and the combination of houndstooth and sparkly seemed like a fabric of which he would approve.  I also grabbed some poly charmeuse to use as lining; this was in a time before I had much of a fabric stash.  I bought everything at JoAnn in one shot because I wanted to make a coat and I didn't want to wait.  The total cost came in under $50 though, despite my lack of planning and sales tracking.

Crazy colorful lining!
I love the back of this coat - it is what sold me on the pattern in the first place.

The back - love the shaping with the darts.
I didn't really like the patch pockets, so I changed them.  I used the Schaffer book to add double welt pockets instead...

My very small pockets.
And my buttons.
So, as you can see, the first coat project was, overall, much better than the second coat project.  I am just now starting on a third coat project (I know, I know - in the middle of summer?  When it is 110 outside? But it is for my sister who will be away in the coming year, so I really do need to make this now), so hopefully I can use what I learned from the previous two projects - muslin first!  Use good quality materials!  Don't use bad interfacing!  Use real silk organza as underlining!  Press, press, press!  But make sure to use a press cloth.  And make sure to use distilled water in the iron.

Now, the official pattern review:


Pattern Description: Lined, semi-fitted knee length coat with buttons and pockets.  View A: notched collar.  View B: shawl collar with cuffs.  I made view B, but I changed the pockets.  Sadly, this pattern is now OOP.

Pattern Sizing: (8-10-12-14) and (16-18-20-22-24).  I made a size 12 based on the upper bust, but I graded out around the hips/thighs to more of a size 16 (which wasn't included in the envelope, so I guessed a bit).

Were the instructions easy to follow?  Yes!  I had never made anything so complicated as a coat before, but I was able to figure out the construction using only the included instructions.  I did use supplemental books to help with fit and design changes, however.

Did it look like the photo/drawing on the envelop once you were done with it? Yes, I think so.  I did change the pockets, but the overall shape and collar did turn out like the picture.

What did you particularly like or dislike about the pattern?  I really like the design of this pattern.  The fitted shape with the darts is really what drew me to the pattern in the first place, and I am very happy with the end result.  I also like the collar options, and the cuffs.  When I first made it, I wasn't too excited by the patch pockets, so I changed them, although I would consider using them in the future.  Also, I like that the pattern seemed to run pretty true to size.  I used a 12 based on upper bust measurement, and it worked well.  Overall I really like the pattern, can't think of any major dislikes.

Fabric used: Some sort of synthetic/metallic blend?  This was before I started really looking at fiber content.  Probably a polyester/metallic as it is from JoAnn.  I used polyester charmeuse for the lining.  I also used cotton muslin for an underlining, and some not so good Pellon interfacing on the collar and cuffs.  Other than the Pellon, I like the materials I used.  The metallic didn't press super well, but it was better than I had hoped it would be.  This coat is really great though - because of the extra cotton layer, it is nice and warm in windy weather, but not too hot to wear when it is only mildly cool.  The only sad thing is about the Pellon starting to bubble after one wear.  Urg.  Learned my lesson right quick - don't use the cheap interfacing.

Pattern alterations or any design changes you made:  This was the first pattern where I really thought about alterations for the sake of fit.  I tissue fit the pattern, and made an FBA (with a dart) and increased the length by 2" above the waist.  I also increased the upper arm circumference, since I have slightly large upper arms.  I was also stubbornly dead set against shoulder pads at the time (that was silly of me, I know, but I was just growing out of my "I don't need interfacing" phase, so we can't expect too much) so the sleeve openings were too low.  I added gussets so that I could move my arms.  Also, I had been reading Claire Schaffer's High Fashion Sewing Secrets, and so I used her technique for double welt skirt pockets, bound buttonholes, and adding extra interfacing to the jacket top front and back.  I am pretty pleased with the welt pockets, but not quite as happy with the buttonholes.  If I were going to make this again I would include the shoulder pads so that the arms would fit correctly.  I would also increase the back width just slightly, since it pulls a bit tight when I move my arms forward.

Would you sew it again?  Would you recommend it to others?  I think I would sew this again, but probably not for a long while.  It is a very distinctive shape and style, which I love, but I want to try other coat patterns in the near future.  I would highly recommend this pattern however, it creates a great hourglass silhouette and is not too difficult, even for a beginner.

Conclusion:  Really like this pattern.  If I make it again, I will have to do some minor alterations, but overall I like the fit and the shape.  This is the first non-costume garment I made, so I really like the fact that I could wear it and show it off.  Also, this project is really what started my interest in learning more about techniques and quality in my sewing, so for that reason it is also a sentimental favorite.


So there it is.  Butterick 5295, my first non-costume project!  I still have a few dresses, some costumes, and a top in my backlog of projects to show off, as well as my skating costumes for this year.  Hopefully some more skating posts coming up as well, 

Monday, July 4, 2011

Pattern Review: Burda 8292

Continuing my theme of posting projects that I completed in time for June, I thought next I would show my most disappointing project: the Burda 8292 coat.  Now, I don't think my disappointment stems from the pattern itself, but rather my poor choice of fabrics and impatience to make this coat in time for the wedding.  I really wanted something that would match my dress, not be too heavy, and not have too many details.  In doing so, I may have made too many pre-emptive fit corrections and been hasty in choosing polyester shantung as my fabric.  In any case this was my first Burda envelope pattern, Burda 8292.

Burda 8292
I chose to make view A - the peter pan collar style coat.  It features in seam pockets and the wonderful Burda 2 piece sleeve.  Truly, I love the Burda drafting, but the project did sort of turn out a mess.  Allow me to present the evidence:

Messy!
This project was an exercise in bad fabric choices.  Originally, I had wanted to make the coat out of a silk shantung or silk dupioni.  However, I was unable to locate silk fabric in an acceptable color for less than $25/yard in time to start the project.  This was before I started to consider the internet a valid source of fabric.  I resigned myself to working with polyester, but I couldn't bring myself to use silk organza as underlining for a polyester fashion fabric.  Hindsight says I should have used cotton batiste, but after reading about the wonders of organza I had really really wanted to try it as an interlining.  Refusing to use silk, and deciding to ignore all published sources and conventional wisdom, I thought to use polyester/nylon organza instead.  This was a BAD idea.  Very, very bad.  While the poly organza did give better body to the fashion fabric, it was NOT happy being pressed.  Not one bit.  Hence the awful racking and puckering of the seams.  The heat didn't do a darned thing to the organza, but it was too much for the shantung.  Sigh.  The seams were better before I pressed them, and I even used a muslin press cloth to diffuse the heat.  Didn't help.  Ugh.

Messy back!
The other great atrocity of this pattern - my epic fail at bound buttonholes.  It would stand to reason that if the fabric doesn't press well to begin with, pressing tiny square opening to make buttonholes would be a bad idea.  It was.  But darned it all if I wasn't going to try to make them.  I measured, re-measured, cut, pressed, re-pressed, pressed some more.  Didn't help.  They ended up a huge mess.  So bad, I am not even going to show you.  The hideousness would blind you.  I couldn't stand it.  So, I covered them up.  I cut little fabric squares which I patched over the mess that was the buttonholes to make a slightly smaller mess on top of them.  I used my machine to create the button holes, which is what I should have done in the first place.  It was still a mess, but at least the hideousness wouldn't blind passer-bys.

The patchwork job.
The other thing I did wrong in my hastiness - I over corrected for fit problems.  Being used to the Big4, and after my recent bout with the Burda Style 04-2011-109 dress, I assumed that Burda also sized for B cups.  Apparently, I was wrong.  After making the coat, come to find, the consensus is that Burda sizes for C cups, they just like really, really low necklines.  Oh.  So for a coat which should cover to the neck, I really shouldn't have to make an FBA, since, as I pondered previously, sewing cup sizes depend on the upper bust to full bust ratio, not the under bust to full bust ratio.  Sadly, I did not realize this until after I had gone and done my usual FBA.  This made the fit on the front and under the arms a big too big.

The front - slightly a bit too big
I did a swayback adjustment here as well.  There are two swayback adjustments I use - one wedges out the fabric from the center back to the side seam, and one is a vertical slash/slide type adjustment for patterns without a center back seam.  Here I used the slash/slide method, which doesn't work as well as a pattern with a center back seam for adjustments, but is still much better than RTW fabric pools on the backside.

I also adjusted the width across the back, which actually did make this coat very comfortable to wear and move around in.  I made a Butterick coat last winter (review to come), and my one fit complaint is that it is tight across the back.  No such problems here.  I think I will probably increase back width on coats in the future, as I really like the ease of movement.  This was often a complaint with RTW coats for me as well, so another win for the home seamstress.

The back!  I think the swayback adjust is pretty good.
Ok, so while the project did end up a total mess, I wore it to the wedding anyway.  Well, I brought it to the wedding, and put it on as close to dark as possible.  Since it is polyester, it did its job and kept out the night chill, but, well, I don't know how soon I would wear it again.  I really am disappointed with the outcome of this coat, although I know it is all due to poor fabric choices and impatience.  I may keep it around to scavenge the buttons though, since I do like them.

A few more pictures, including the lining:

I do like the shape of the collar.  Mine needed more interfacing.

Check out the matching sleeve seam lines - the wonders of Burda drafting.

In seam pockets.
The lining.

Another lining shot.
So, although I have basically rambled on at length about my issues with the coat, here is the official pattern review:


Pattern Description: Coat with length, button, collar, and pocket options.  I made view A - the long coat with peter pan collar, in-seam pockets, and 5 buttons.

Pattern Sizing: Burda sizes 36 - 48.  I used a size 40 up top, and graded out to a size 42 around my thighs.

Were the instructions easy to follow?  I thought so.  I know a lot of people don't like Burda instructions, but the envelope patterns seem to have much better instructions than the magazine does (these were more like Big4 instructions, although some of the terminology was a bit different).  I think envelope patterns might be good for people who want to try Burda, but don't want to deal with the tracing or crazy instructions.  I also know some people have previously had problems with the collar, but if you look at the pictures, I think it is not too difficult to figure out.  

Did it look like the photo/drawing on the envelop once you were done with it? Erm, sort of.  My coat suffers from poor choice of fabric and underlining materials, so it didn't turn out too well.  This isn't a fault of the pattern, just bad choices on my part.  If you ignore the fact that it isn't well made, the coat does look very much like the envelope.

What did you particularly like or dislike about the pattern?  I love that all of the pattern sizes come together in one envelope.  In the Big4 I often find that I fall between the size cut-offs for their patterns, but since Burda comes all together I can adjust sizing to my heart's content.  I love the collar - it is so cute!  I also like the in-seam pockets and the length options.  I am also a huge fan of the Burda 2 piece sleeves.  Burda drafting is top notch.  Dislikes: I think the in-seam pockets bags are a bit too small.

Fabric used: Here is where I ran into trouble.  I wanted a lightweight coat to match my dress for an outdoor wedding.  I had seen a silk coat on a sewing blog and really wanted to make one, however, I was unable to find the right weight of silk in the right color at the right price before I started the project, so I settled for polyester shantung.  It was a little bit too drapey, so I thought to underline it with organza.  Only, I couldn't bring myself to spend more on silk organza underlining than on the fashion fabric.  So I used polyester/nylon organza.  This is a VERY VERY BAD idea.  Do not do this.  Nylon organza does not press.  It did give the necessary body to my fashion fabric, but it caused the seams to pucker like crazy AFTER I pressed them.  I should have used muslin or cotton batiste.  Lesson learned the hard way.  In the future I will put more thought into the materials I am going to use before I start the project.  I used a polyester charmeuse for the lining, which, actually, I really did like.  I used the Palmer/Pletsch lightweight interfacing for the front and the collar, but I would use a more heavy weight, or multiple layers of interfacing in the future to make the collar a little more stiff.  The lightweight stuff worked well for interfacing the front pieces of the coat.

Pattern alterations or any design changes you made:  Here again I caused myself trouble.  Since I was sewing on a deadline (I wanted this in time to wear to the wedding), I thought it would be faster to make my "usual" alterations and sew stuff up.  Umm, yeah.  Not the best idea since this is only my 3rd Burda pattern (first Burda envelope pattern).  I didn't know that Burda was sized for a C cup, so I made too much of a FBA, which caused fit issues on the front, which I am sure wouldn't be there had I just left it well enough alone.  I lengthened by 2" and made a 1.5" swayback adjustment, which did help the fit.  I also added 1/4" to the shoulder blade area which made it very comfortable to move about in.  I think I want to try making a muslin straight from the pattern, then adjusting the fit next time, because I am sure it would turn out better than me scrambling through the fitting process.  I also, for some reason, stubbornly decided I wanted bound button holes.  This is dumb if your fabric doesn't press, because it is very hard to get nice perfect openings when the fabric keeps trying to unfold.  So I patched over them and used machine button holes, but it doesn't look too pretty.  Again, a fault of the fabric, not of the pattern.

Would you sew it again?  Would you recommend it to others?  Yes, I want to make this again!  I really do like this pattern, and I want to make it out of fabric that will allow it to achieve it's true potential.  I think the collar is super cute, and I love the sleeves.  I think I might try to make view D/E next time (the shorter style coat) because I think I could get more wear out of it than the long version.  I think I need to reconsider some of my alterations before I make it again, however.  I would recommend this pattern, but make sure that you don't use too flimsy a fabric and that you use a decent amount of interfacing in the collar.

Conclusion:  I really like this pattern.  I have really liked all of the Burda patterns I have used so far.  This project is a flop due to over-adjusting the pattern and poor fabric choices, but I think the pattern is a win.  Even with the ugly problems, I still brought the coat to the wedding (although I waited until as close to dark as possible before putting it on).  I don't think I will wear it much in the future however.  I think I need to re-start with a muslin straight from the pattern before making adjustments next time, and I really should use better quality fabrics in my future projects.  This coat took too much effort to deal with lousy materials that didn't want to behave.  I don't know that I will make another right away (lot's of other projects and patterns I want to try first), but I do want to try this pattern again in the future.

So there you have it!  The Burda 8292.  It is very much the opposite problem of Simplicity 4014.  With the Simplicity dress, I was very proud of my fitting and construction, but I hate the pattern.  Here I love the pattern, but I hate my coat.  Sigh.  This seems to be the year of the wadders.

Pattern Review: BS 04-2011-109

Ok, I am still super happy with this dress that I made, and I can't wait any longer to post it.  As you may recall, I was invited to a (most excellent and absolutely lovely) wedding in June.  My fourth wedding ever, and third in recent memory, I was determined to wear something other than my standard blue dress which was bought several years ago, was always mildly large up top, and is now in danger of crossing into "indecent exposure" territory.  Of course, I had originally planned to make Simplicity 4014, but as previous blog postings will show, that was a failure of epic proportions.  In addition, since I had needed to re-make my figure dress for this year (yet another project post to come), I was behind schedule in terms of finishing projects for all of the June events I was attending.  So, after the failure that was Simplicity 4014, I madly rummaged through my fabric and pattern stash and decided to take a gamble on BurdaStyle 04-2011-109.

BS 04-2011-109 the line drawing on the right.
As you can see (or maybe as you can't see), Burda intended for this dress to act as a shift or underdress for some of their sheer chiffon creations.  They even re-used it in the May issue:

Difficult to see, but the 04-2011-109 is the underdress here too...
In any case, this was a dress I didn't even notice when I first got the magazine.  It isn't really visible in the model photographs, and it wasn't something I ever thought I would make when I first looked through the patterns in this issue.  However, when I was desperately searching for something cute, simple, and non-matronly, this seemed to fit the bill.  I had a lot of Vogue options that I was considering, but they seemed far too dressy for an outdoor wedding.  So, once I had settled on this pattern, I had to pick a fabric.  The problem: my stash consists mainly of fabric for skating costumes.  The good news: this pattern needs a fabric with some stretch.  After pondering my options, I settled on a stretch lace I had picked up as a remnant in San Francisco (1.25 yards for $7, regular price $16/yard).  I had wanted to use it for a skating costume, but, honestly, I think it is too light and juvenile a color for me for skating.  Also, I didn't have enough yardage for sleeves.  For a regular dress, however, loved the color:

My stretch lace!
I had just barely enough to make the dress.  I used 2 layers of white stretch cotton under the lace.  The top layer is thick and textured, the bottom layer is very thin and acts as a lining.  I am always suspicious of white, so I figured I was better safe than sorry with the layering.  The dress was a bit heavy, but since it was cotton, it wasn't too hot.  I also got some trim from JoAnn's to add to the dress.  I have never been able to wear a dress in this style before, because I could never find one that fits.  I also don't usually wear "trendy" clothes, but I think the lace and color move this dress into the trendy category.  Strange to even be pondering how well my dress fits with current fashion trends, because usually I don't care, but in a way it is sort of exciting to make clothes that could be deemed "fashionable" I guess.

So, anyway, finally pictures of my finished dress:

My dress!

It is a little small for the dress form...

But the form helped with the crazy swayback fitting.

My mostly invisible side zipper

Actually, the zip is really good, except where the trim adds bulk.

I really like my trim though, so it is forgiven for messing up the zipper.

I used lace trim to do an invisible hem - stitched by hand to the white cotton lining.
And, as an added bonus, I got pictures of it actually being worn!

The front - super happy with the fit on the top.
The back - still a bit wrinkly, but not anywhere near as bad as most RTW.
I am super happy with this dress.  It looks a bit wrinkly in the person photos, but part of that is because I took them after sitting for a while, and part is the super high contrast from the very sunny day.  In real life the seams are pretty smooth (like the dress form pictures) but it is hard to tell from these pictures because the dress form is a tiny bit too big, which makes the dress gape and wrinkle where I can't close it all the way.  In either case, it is super comfy to wear and I love it.

So now, the official review!


Pattern Description: Fitted sheath dress.

Pattern Sizing: Burda sizes 36 - 44.  I used a size 40 up top, and graded out to a size 44 around my thighs.

Were the instructions easy to follow?  I thought so.  I know a lot of people don't like Burda instructions, but I thought these were pretty decent.  Of course, it helped that the pattern was super simple as well.

Did it look like the photo/drawing on the envelop once you were done with it? Difficult to tell, since the photo of the dress is covered by an outer dress, but I thought it looked a lot like the line drawing.  I added trim under the bust instead of along the top of the dress, however.

What did you particularly like or dislike about the pattern?  I love the fact that the pattern is so easy to put together.  It doesn't use a lot of fabric, and the number and location of the seam lines make it very easy to fit to a body.  It is a basic pattern that can be made up in a lot of different fabrics to get totally different looks.  No dislikes.

Fabric used: Stretch lace lined with stretch cotton.

Pattern alterations or any design changes you made:  I added trim at the seam under the bust.  I also added a lining because of using the lace material.  I had to do a 1.5" swayback adjustment, and I needed to raise the top because it was very low (just the way Burda likes it).  I did that by adding an inch at the full bust point so that it would give more coverage.  I also raised the area under the arms by about 1/4" so it would fully cover my undergarments.  I also added 2" of length to the waist area.  These are my usual adjustments for most patterns (in terms of adding length), so I think this pattern is well drafted.

Would you sew it again?  Would you recommend it to others?  I want to make this again!  I got some purple stretch taffeta that I want to use for this pattern.  This may become one of my first TNT patterns, I love it that much.

Conclusion:  Love this pattern!  Because of all the seam lines, it is very easy to fit to your body and make it look good.  Simple to make with pretty good instructions for Burda.  Since the design is so simple, the fabric can really determine if it will be a simple day dress or a special party dress.  It wasn't one that I was immediately drawn to in the magazine, but I am very happy I tried it out.

So yeah, not too much in the official review, because the pattern really was a joy to make, and I love the results.  Total satisfaction.

Coming up next: a review of my coat, in which the results are a little less satisfactory.

Sunday, July 3, 2011

Skating Update: 2011 Regional Results Posted

July is here and that means everyone is obsessing over the upcoming National Roller Skating Championships.  So it is with every summer.  The final regional meet has just concluded, and the National website has posted results for those qualifying to the National meet.  Here are the results:


Saturday, July 2, 2011

Pattern Review: Vogue 8727

I figured I would work my way backwards with what I have made in the past few months.  Most recently, Vogue 8727 - a summer dress for my sister.

Vogue 8727
Here is my version:

I made view E (blue picture from pattern envelope)

The front on a person!  With pockets!

The back on a person!  Still has pockets!

Invisible-ish zipper!

I added a waist stay because this dress is HEAVY.

Very full skirt - great for twirling.
My sister picked out this fabric a while ago and wanted a dress for summer, so once she got home from school I made this up for her.  I like sewing for her - she requires far fewer pattern alterations than I do.

Pattern Description: Lined dress with two top and three skirt options.  The tops are either halter style or covered back with a zipper.  The skirt is either a pencil style, or a full skirt (in two lengths) with pockets.  I made view E - the zippered back and shorter length full skirt.

Pattern Sizing: (6-8-10-12-14) and (14-16-18-20).  Although I include sizing info for patterns I made for myself, I won't include sizing info when I sew for others.

Were the instructions easy to follow?  This was a super easy dress!  There are a lot of steps in the instructions, but they break down the construction step by step and it is really simple to follow along.

Did it look like the photo/drawing on the envelop once you were done with it? Yes!  Since the style is very simple it looks remarkably like the drawing on the envelope.

What did you particularly like or dislike about the pattern?  I really like the finished product.  The pattern is well drafted and I think it would look good on many body types.  I like the options for the top and skirt, and I LOVE the pockets on the full skirt.  Some dislikes: it uses a LOT of fabric, which makes it heavy, and it takes forever to cut out the skirt (8 pieces for the main fabric, 8 pieces for the lining), and it takes forever to hem it.  Also, since the front midsection piece is curved, it is a bit difficult to sew to the top pieces without getting some of the extra gathered fabric caught in the stitches, so it is best to go very slowly and be very careful while sewing these sections together.

Fabric used: Cotton sateen with some stretch, and a very light poly lining.  I used 4 yards of the cotton sateen and about 2.5 yards of the lining, so overall yardage was about 6.5 yards.

Pattern alterations or any design changes you made:  I made a slight FBA alteration by adding length to the top at the bust point, but reducing the length of the straps by a slightly lesser amount (essentially I increased the length of the top by 1/4", but I had to reduce the strap length so the top would fit in the correct spots).  I also left off the top stitching because I felt like the dress would be slightly more versatile without it.  With the print on the fabric, I felt that adding top stitching would force the dress to be casual, but without the topstitching it could be dressed up or down depending on the occasion.  I also added a waist stay because the dress is super heavy, and most of the weight is from the full skirt.  Other than that I pretty much used the pattern as drafted, and it turned out very well.

Would you sew it again?  Would you recommend it to others?  I might sew it again.  Since I made this pattern for my sister, I would have to re-trace and re-alter the pattern (and, actually, probably buy the other pattern sizes to start with) if I wanted to make my own.  I don't know that I want one for me - there are other patterns I would rather make first.  I would, however, consider sewing another one for her, but she has already picked out a few other things she wants, so I don't know how soon I would make this again.  It does look pretty good and she loves the pockets on the skirt, so I would make it again if she asked though.  I would highly recommend this pattern to others - the skirt options and style can flatter many body types and the pattern is simple enough to be easy to put together.

Conclusion:  Love this pattern!  This project was a great example of the right fabric for the right dress.  I loved working with the cotton - it pressed so nicely compared to the polyester nightmare of my previous project.  The pattern is very well drafted, and this style is super cute!  The only tricky spot is attaching the front midriff to the top of the bodice front, but the rest is very easy project with great potential for success.  This is a lovely summer dress and one of my favorite projects to date.

Confession Time: Accumulation of a Stash

So while I haven't been posting or sewing much lately, I have been thinking about sewing and acquiring lots of new fun fabrics and patterns in the last half month.  Firstly, Fashionista Fabrics had a huge sale of old Burda World of Fashion magazines.  Sadly, they are all sold out now, and they currently only have June 2011 and July 2011 in stock.  I, however, was lucky enough to snag some old BWOF magazines.

BWOFs: 12-1997, 01-2001, 01-2002, 04-2002, 09-2003, 01-2004, 02-2005
Oddly, while I find some of the styling and fabric choices very dated, I love many of the patterns in these issues.  There are at least 3-5 patterns in each issue that I absolutely have to make at some point in the future, but there are about 10-15 patterns that I like from each edition.  I am in love with the September 2003 issue.  There are at least 7 must make patterns, and another 6 in contention.  It is my favorite issue so far in my small but growing Burda collection.  It is sort of odd to look at these magazines and think that I was in elementary/middle/high school when these were published.  It is sort of odd because a lot of these magazines talk about trends that are coming around again (like exposed zippers), but I never really noticed them as trends in my younger days.  There are some things in the older BWOF that aren't in the newer Burda Styles, such as recipes, pattern alteration tips (one of these discussed large hips/small waist - worth the price just for that article!), and fashion destinations (one issue talked about Paris fashion, and another fashion in Sweden).  Also, looking at the older tracing sheets, I can see why people are so upset by the new ones, but, having started with the one sheet mess going back to the older BWOF will just make things easier for me.  I will say, I do like the new "Best of Burda Style" section in the new BurdaStyle magazines where they make four outfits mixing and matching pieces from the current and previous issues, as well as adding accessories.  I think it really helps to see how to maximize a piece's potential and it often helps me look at some of the patterns in a different light.  Although, mostly, it just makes me sad that I don't have access to some of the older patterns.  Overall though, I am super excited by my Burdas and I can't wait to start using the patterns.  Sadly, I have a few other things that need to get done first, but after that there may be a long string of Burda items making way to my closet.  I will, however, have to figure out the best method for cataloging the patterns in these magazines.  The Russia Burda archives don't go back farther than 2000, and they don't show all of the pattens or line drawings for many of the older issues.  Ah, well.  A happy problem to have I suppose.

Ok, so aside from stocking up on the patterns, I have also accumulated lots of fabrics.  Although really, it isn't quite as bad as it seems.

Firstly, I bought fabric online from Fashion Fabrics Club as a starting point for my sister's up and coming wool coat.

Close up of the black wool.  It is a true black, but I needed flash to show texture.

But while I was there I couldn't resist throwing in some slinky fabric ($4) for a skating practice dress, and some lavender rayon jacquard for a Vogue vintage dress for my sister.

Slinky glitter fabric for a skating dress.

I had gotten 2 patterns for her summer dress, and while we had decided that V8727 (review to come) was actually the better pattern for the fabric, my sister fell in love with V2960 and wanted a dress exactly like the one on the envelope.

V2960 - My sister wants the one on the left.
Rayon jacquard for V2960.
I really love this fabric - it is soft and drapey, but I have a MAJOR problem with it - it doesn't wash well at all.  The instructions say to wash cold, but a sample swatch went through the washer and dryer and it didn't even look like the same fabric after.  There is some major shrinkage going to happen, so it needs pre-treating, but I am debating to wash cold/air dry or if I should try to steam shrink in the dryer.  I may have to test both methods and see which works better.  If there are any other suggestions please let me know.

I also got some purple silk charmeuse from Fabric Mart for the coat lining.

Planned purchases - the purple silk is bottom left.  The black wool is top left.
I still need to get some organza for underlining and I need some hair canvas for the collar, etc. but I should be ordering those soon.  However, while I was looking through the Fashion Fabric club offerings, I noticed the $20 10lbs mystery box deal, and I thought it might be fun to see what would come out of that.  I am actually super pleased:

Destined to be muslin - poly(?) floral chiffon, pink cotton gauze, beige broadcloth, navy lycra (not the best quality, so I will use it to test new skating patterns)
More mystery - black wool? left, paisley and brown velveteens, beige polyester upper right (soon to be pants).
The pretties (clockwise from upper left): embroidered organza, gold silk, blue/gold silk, light blue silk.
This is a TON of fabric for $20.  I think I got something like 4 yards of the navy lycra, 3 yards of the beige polyester, and 1-2 yards of the other fabrics.  I have plans for a lot of them already - a few jackets and some costume pieces.  Maybe some shirts from the light blue silk and the bright pink cotton.  In any case, I like the mystery box and I will probably order it again when I order from FFC.

Of course, the fun doesn't stop there.  Since I was recently on a trip, I picked up some more fabric from the Hancock's and JoAnn's in the area.  Now, while I do have local JoAnns, this store had different stuff, or it had stuff I had been eyeing on 60% sales, which really can't be beat.  And there aren't really any Hancock stores close by, so I hadn't seen anything like a lot of their stuff, so I went a little nuts.  Overall I made out pretty well on the trip:

From Hancock (clockwise): plaid acrylic for a skirt for the sister, blue rain-proof fabric for a jacket, green cotton/poly jersey for a shirt, plaid cotton for a shirt.

From JoAnn: Poly rainbow print, metallic print linen ($3), black rayon jersey, purple stretch taffeta.

From Hancock: Red stretch "lace," gold and pink stretch metallic fabrics, all for skating costumes.

More from Hancock: printed red lycra, blue lycra, black stretch lace.
I am super excited by my bright blue rain fabric.  It is coated in a rubbery material on the back to make it water-proof, and it was on sale for only $7/yard, and it is one of my favorite colors.  I want to use a Burda pattern for the jacket, but I will need to read up on what sort of needle and thread I should be using.  I also really love my polyester rainbow print from JoAnn's.  I know, I know, it's polyester, but the print is so pretty and the hand is super light and nice.  Not sure yet what it will become, but I really do like it a lot.  And I am super super excited about my fabrics for skating costumes.  I am always looking for something different and interesting, and I haven't seen fabrics like these too much before, so I am pretty excited about these purchases.  I wasn't going to be making new skating costumes for a while, but I may want to whip something up from the blue stuff for the summer.  Also, shout out to awesome cutting dude from Hancock!  It was nice to have someone understand that it is difficult to find good fashion fabrics and that when you see something you like, you get it because next time it probably won't be there.  It was also nice to have a cutting person who (at the very end of the day even) was super pleasant and happy to help even when you wanted to get something like 15 yards of fabric...

So yay!  Major stash accumulations in the past month.  Now that I am back and done studying I really need to get back into sewing stuff up so I can stop thinking about it and actually wear it.

Friday, July 1, 2011

Triumphant Return

At last, a return to blogging.  I have been super busy the past few weeks, but all is well.  Passed some important written tests, and some important skating tests.  It is good to accomplish something 13 years in the making.  I think I have always been better at setting long term goals than short term ones, but it is a bit odd to get so close or actually reach the goals I set for myself so long ago.  I don't know.  I like working towards a goal, but I don't think I actually react well to having achieved it.  I would always get sad at the end of a school term because it was over, and it was too late to work harder and do better.  So it is with this.  I passed, I did well, I got what I wanted, but, well, now it is over, and I can't do it again and I can't make it better.  And I do have other goals I have set for myself, but I can see the light at the end of the tunnel and it scares me.  I mean, I am doing what I said I would do, and that gives me satisfaction.  But I also know that some things I wanted to happen won't happen, and it is very difficult to look past that.

Ah, well, this was supposed to be a happy post.  Shows what a long day of travel does to the mind.  Enough of this introspective brooding crap.

In other happy news - it is July!  So I can now post about the dress I made for the wedding, skating costume pictures, and stash accumulation pictures.  I can continue to ramble on about skate dances, and I can finally get back to reading random fun stuff instead of study materials.  Hopefully I can start cranking out some new posts soon.  As for now, it is time for a well deserved night's rest.