Friday, June 14, 2013

Newsflash - July Burda Preview Posted

The full preview of the July Burda has been posted to the Russian Burda website.  As I feared/predicted/have come to expect, since the June Burda was soooo good, the July issue is, well, just not.  I mean, there are some good pieces, but nothing that I would consider truly spectacular.  And the crazy.... oh yes the Burda crazy is out full force this issue.  Though to be fair it isn't exactly the patterns that are nuts, but the context in which Burda expects you to wear them.  On the Plus side, there are a few simple, practical, and wearable patterns in the Burda Plus section.  Though there is a bit of crazy in there too.  So, let's jump to it shall we?

First the good stuff:

Hot!  I love the back of this dress, though I would change the skirt front if possible.
My only concern is supporting the boobage.
Maybe a good place to use my skating costume skills to sew in a bra...

A variation on the above dress, but with more practical support system.

Line drawing is uninspiring, but the model/garment photos
may have won me over on this one.

Another sexy back!
Again, maybe not practical but the back looks great.
If I ever need a swimsuit cover up...

Basically a square that wraps around your body.  Hmm.
Well, if I ever have to go to a Toga Party I guess Burda's got me covered.  Heh.

Pretty!  This shirt is probably my favorite thing in this issue.

Though the model's terrible posture pretty much ruins the effect of the shirt.
Also looks like it has the classic low Burda cut.  Perfect for wearing a cami under though.

At first this shirt was sort of meh, but it has been growing on me.
It would be a great layering piece for summer.  And super classy in a lovely silk.

I don't have a lot of shirts that I think look good tucked in,
but this would be a perfect candidate for that.  It's going on my list.
As for the skirt that I loved on the model photo...

The line drawing gives me a bit of a pause,
because I am not sold on the ties, but I might still try it.

Basic pants in a crazy print.  I can live with that.

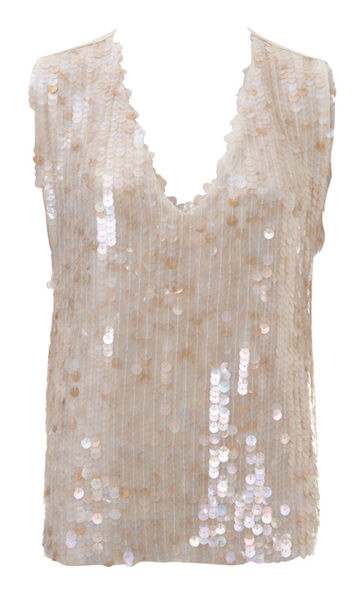
This tank is pretty boring, but perfect for use with
sequin material, so it goes on my yay list.

Shorts are practical for summer.  And these are some short shorts.

I know, I know - who needs another cowl neck?
I do!  I have plans for those straps.  Oh yes, indeed I do.

Cardigan is not exciting, but not terrible.

The top of this dress is suitably interesting, but, again,
maybe we will be having support problems.

Jacket is a bit more boxy of a cut than I typically go for, but it is alright.

Line drawing because the black is a bit hard to see...

And our vintage pattern for the month... a basic t-shirt.   Eh.  
iPad cases!  Can you say easy gift sewing?
There were also a few useful patterns in the lingerie category this month as well:

I still need to make a slip.  I think there are others I like better,
but the color and the lace here are pretty, so, well, inspiration at least.

Half slip.  I feel like these are hard to buy anymore, but could be rather useful.

The shorts... are a bit crazy, but the top is sort of cute.
With modifications I could see it being a fun sports bra.
The other goodies in this issue were all in the Burda Plus section:

This top is super cute!  I might be making one in the future...

Also love this dress, though I would probably adjust the hem length.

Super classy!

Basic, but practical.

Actually I really like this skirt.  Might make one for me.
(And, no, Burda was not so crazy as to pair the hot pink lace top
with the hot pink lace skirt.  Thank goodness.)
Ok, so that was the good.  Now for the not so good.  It seemed to me that Burda has been somewhat restrained in the cray-cray department the past few months (yay more goodies for us), but this time there is just so much I am left shaking my head over.  Some of them because the patterns are just wrong.  Others simply because of the context of the model photos.  Fair warning: there is some seriously ugly.  Can you handle it?  Are you ready?

Fur at the beach?  Burda, what are you thinking?

Though I don't think a fully sequined cardigan is much more practical.

Then again it looks a bit better in a different environment.

Then again again, it sort of looks like a bathrobe on its own.

I didn't know it was possible to make a "classic" work shirt look this sloppy.

Even the Burda Plus section couldn't be left alone...
Is it me, or does this top look like there are mistakes?

But no!  Is designed that way.

Stretch lace seems to hide the oddity a bit better...

Why would you steal your poor granny's clothes
to wear as beach cover ups?  That is just mean.

You took her nightgown too?!

Thoughts that come to mind:
"Bad skating costume" and "Pinwheel of Death."

Ok, this looks like a waitress costume, right?  Right?
Only, like, from a diner set in a really low budget sci-fi movie.
Oh yes, it seems like Burda has been stocking up on the crazy and unleashed it all in one go.  Overall impressions: meh.  There are a lot of tops I like, but nothing really spectacular for me in this issue.  Most of the dresses are a bit impractical, even if they look great on the beach-ready Burda models.  And then there are a whole lot of head scratchers on top of it all.  Despite this I will still (reluctantly) choose a Best of BS for the month of July:

Purple Burda Plus dress!
I think it is elegant and classy, which in this issue was enough to push it to the top for me.  Though I had a hard time deciding.  The "stand out" dresses were just a bit too impractical to hit the top spot for me, and the shirts are useful, but not terribly exciting.

Which means we now need to pick the worst pattern this month.  This was similarly difficult, but for the opposite reasons.  So. Much. Ugly!  But, well, in the end I had to give the BWTF Award for July to:

The Space Waitress!
Ok, in an absolute sense, some of the other patterns might have been uglier.  But they could also concievably be used for nightgowns, or swimsuit cover ups, or other things that don't require you to leave your home.  There is no way this could be meant for anything other than a dress.  That one would wear outside.  In public.  So, um, yes.  It loses.

And that's what I got.  You guys see anything you particularly like?  What are your thoughts on the sexy beach dresses?  Would you be able to wear them as a dress (and not just as a swimsit cover up?  Or does bouncing boobage give you pause?  Feel free to debate, discuss, and pattern bash in the comments.

Friday, June 7, 2013

The Best Thing About Sewing For Other People...

Ok, well, maybe not the best thing, but definitely one of the perks is the need to go to the LA fashion district on a fairly regular basis to buy fabric, rhinestones, and supplies.  And it seems to have ended up as something of a tradition to end each visit at the Michael Levine Loft - the $2.50 per pound rummage sale of fabric.  And, as usual, I have managed to walk away with far too much yardage of far too many goodies:

These are very stretchy mid-weight fabrics in navy, green, and red.
I am thinking I could makes some great slim-fit pants, shorts, and trousers.
I probably have enough of each to make at least 3 pairs of pants.  At least.
Left: Poly blend plaid.  Loved the plaid pattern too much.  I see some skirts in my future.
Right: This is a heavenly feeling wool.  Heavenly.  At $2.50 per pound!
Assorted knits.  The black and teal on the back left are for skating costumes,
the purple on the left will be for shirts for my sister,
the center ITY knit print will be for a summer tank top.
Right back: will be for a draped cardigan, the plain grey in the center right
will be for the softest t-shirt in the world (this stuff is sooooo sooooft!),
and the fun print in the front will be used for a fitted cardigan.
Yum.  Lots of fun fabrics on the super cheap.  Yeah, I might be going insane and tearing my hair out with pre-regional sewing stress right now, but, well, at least it isn't all work and no play.

Monday, June 3, 2013

Skating Dress Tutorial Part V: Sewing Elastic

Ok, so last time we left off with a fitted leotard.  Now we have to add elastic to all of the arm and leg holes, as well as all of the other openings.  The elastic will (1) give a finish to the exposed edges and (2) keep the skating costume in place during actual skating activities.  I will be using 1/2" braid elastic for the legs and 3/8" braid elastic for everywhere else.  I prefer the braid elastic because it is softer than the knit, but still has good stretch and recovery.  I have also been able to throw it into countless washes after hours of practice and it holds up well.  So that's my argument for braid.

(1) Cut the 1/2" elastic for the legs and sew it into loops

The pattern instructions should tell you how much elastic to cut out.  If you are using Kwik Sew, however much it is, it is too much.  Consider going down a size (or two!) to figure out how much elastic to cut.  The pattern wants the elastic to look pretty when sewn into the pattern.  I (as a skater) want it to STAY IN PLACE while I am skating.  Do yourself a favor - reduce the elastic requirements on the leg holes.  Once you have it cut, sew it into a loop (one for each leg) and divide it into fourths with pins.


(2) Pin elastic into leg openings as evenly as possible and sew with zig zag or serger

There will be more fabric than elastic.  This is good!  It means the elastic will keep the fabric stretched and in place.  I use the serger to attach the elastic to the fabric, but you can also use the sewing machine.  I think the sewing machine offers more control, so I recommend that for the first few attempts, but the serger will provide a neater edge.  On the regular machine I use a regular zig-zag (NOT a three-step - if you use the three-step the elastic won't be able to recovery and will be stuck in the stretched out shape) with length 3.5 and width 5.5.  When attaching the elastic, make sure to STRETCH THE ELASTIC BUT DO NOT STRETCH THE FABRIC.  This is key to success.  Attach the elastic to both leg holes.

My stitch selections for 1/2" elastic.
Pin the elastic circles into the leg openings.
Stretch the elastic as you sew it to the fabric.
The serger will give a neatly finished edge on the inside.
Make sure the blade doesn't cut through the elastic!

(3) Fold over the elastic and sew with zig-zag

Folding it over gives a nice edge to the opening, but also reinforces the elastic.  Make sure to do this step with the sewing machine, using a regular zig-zag stitch.  Again, stretch the elastic, but not the fabric you are sewing it to.

Fold over the elastic so the raw edge is on the inside and covered edge is on the outside.
Make sure you stretch the elastic, but not the fabric.

(4) Insert elastic into the upper body

For the rest, I use 3/8" elastic.  If there are arm holes, use the same procedure as the legs (forming loops, etc).  For everything else I just stretch the elastic as I go and use however much I need.  I typically use a 5.0 stich width for the smaller elastic, but still 3.5 stitch length.  It is essentially the same technique as the leg elastic.

(5) Attach elastic straps

If I am using elastic straps to keep the bodice in place, I attach them at this point.  I sew them to the back opening, then try on the leotard and pin them in place in the front.  I then sew the front ones in place.  For this I use the regular zig-zag stitch.  Niether of my tutorial dresses have elastic straps, but here is a look at one of my older costumes that used them:

The straps are just fabric-covered elastic.
I sew them to the back, then pull them to the front to pin and sew in place.

(6) Sew in the bra

At this point you should have a leotard fully finished with elastic.  Often times (especially with an exposed back) you need to figure out what to wear under it.  The easiest solution is usually to just sew a bra right into the outfit itself.  Since I make a lot of costumes, I usually can't bring myself to sacrifice anything more than $10 for the bra.  I hunt Target, WalMart, Kohl's, etc. for sale-rack items.  These are usually not exactly my size.  Often, the band size will be too big.  But, that is ok because we mostly just want to use the cups.  It is important that the cups are big enough and that they are smooth so as not to look bunchy under the dress.  Sewing it in is very easy - wear the bra, and put on the leotard.  Pin the bra to the leotard wherever it crosses the elastic (ie, when it goes from being not exposed to exposed, pin it there).  Unhook the bra, but leave it pinned into the dress.  Sew the bra to the dress using a zig-zag.  Make sure you are stitching over the elastic that is at the openings of the dress.  Cut excess bra pieces off and marvel at your leotard - complete with elastic and support!

Bra is pinned and ready to be stitched to the elastic of the back.

Next time we will tackle the fussy part - attaching the skirt!

Saturday, June 1, 2013

Not a Pattern Review: Another McCall's 6078

I have made this pattern several times before, and consider it a TNT, but this time I made one for my sister.  I had to trace a different size, but even with tracing, cutting, and sewing the top only took a little over two hours to complete.  It was a bit of an excuse to get away from sewing skating costumes for an evening.  And to quiet the nagging from the peanut gallery.  Oh, and it also gave me an excuse to figure out how to thread a twin needle on my new Janome, which is a bit different from my old Brother machines (and wasn't described in the technical manual).  All in all a nice, quick, easy project and everyone is happy.

My sister really wanted a top to go with this skirt she bought.
She ordered a few ITY knits from Fashion Fabrics Club so we could have color options.
Of course, that means I owe her a few more tops in the future.
I used my lazy man's narrow hem - serge, flip, twin stich.  Easy peasy.
Easy top with great fit an minimal effort!
So I actually did a little non-skating sewing!  But still not for me...  Oh well.  At least now when I do a lot of selfish sewing in August I will feel totally justified.